Showing posts with label NX-1600. Show all posts

Sunday, March 11, 2012

Replacing Starter in Nissan NX-1600


The 1992 Nissan NX-1600 is in its 20th year of existence which is like 50 in human years. As such, parts of it are starting to wear out or malfunction. In 2011, the front struts were replaced and now the car will sometimes not start. When the ignition key is turned, a clicking sound is heard. After poring over the schematics and ruling out that the inhibitor relay was the problem, it came down to the solenoid (magnetic switch) or starter or both.

This procedure is not for the faint at heart plus it helps to have good hand and wrist strength. The starter on the Nissan NX-1600 automatic transmission is located about in the middle of engine facing the firewall. The Nissan technical guide does not really provide good method for removing it. I needed another person to help me remove and put the starter back, in this case it was my dad.

The Nissan service manual says to remove the battery, air cleaner, intake air duct, EFI harness, vacuum hoses, and speedometer cable. In addition remove rear buffer rod, buffer rod bracket, and intake manifold supports. Next remove starter from transaxle side from engine compartment upper side.

My plan was to move components out of the way on the top driver side of the engine area so starter could be unbolted. Next, the starter needed to be freed from its compartment from under the car. My method was to remove the oil filter and then unbolt a Y shaped intake manifold support allowing the starter to drop down and then be removed through the top of the engine compartment. So I would suggest changing the oil since you are under the car anyway to remove the starter and have to get the oil filter out of the way.


To remove, one must first disconnect the battery. I completely removed it to provide more area to work.  After that undo the four clamps on the air filter housing and lift the top up. Next, unfasten the o-ring clamp on the large air hose (I think this is called the intercooler) going into the manifold.  There is also a smaller hose that needs to be disconnected. With those items moved out of the way, one of the mounting bolts should be exposed that was hidden by the air filter casing. Next picture shows the bolt holding one side of the starter.  The other bolt is out of sight (see next picture) and needs to be felt for if accessing from top of engine. I used a racket with either a 12 or 14 mm socket to loosen and remove.


These next two pictures show the bolt locations of the Y shaped support for the intake manifold. It is held in place by 3 bolts. The two top ones bolt to the manifold and the last bolt to the engine block(?). The bottom bolt is in a tight space so you will need a smaller racket profile.


I had some issues with the cable that goes to sensor(?), it might have something to do with the oil as it is right next to the oil filter. The cable went through the manifold support and I tried to disconnect the cable but did not want break it as I already had enough to do getting the starter working again. It would have been nice to take this cable on a different path as it caused some troubles when I put the manifold support back on later.


Once the starter was removed, the solenoid (Nissan calls this the magnetic switch) seemed okay but the starter seemed seized up. I then had to decide buy a used starter on eBay that was untested $40, a rebuilt one from AutoZone or Pep Boys or Oreily's for $70-120, or take it to a local shop near my home to be rebuilt for $90-100.  I decided to give the local machinist a try at P & D Auto Electric Service, 3523 Chenoweth Run Road, Louisville, Kentucky and telephone number 502-267-7144.


I visited the shop that is next to the owner's home. He got the starter and put it on his test machine. It did not start after several attempts until he hit it.  Intrigued by it starting, he took the starter to the work bench and started to take it apart. It was somewhat dirty inside but the problem was not obvious until he got to section that was in a diamond shape part called the brush holder with 4 metal brushes(?) located every 90 degrees. One of the metal pieces appeared worn down which was making intermittent contact. He said the starter needed to be cleaned and this part replaced and all should be well. It seemed like a good diagnosis so told him to fix it and hopefully it would be ready in 3-4 days.

He called be several days ready and the starter was ready. The price was below estimate and I was happy to get the part back so the car could get to running again. The starter was placed near the cables to be connected and the S terminal on the solenoid and the battery cable. Then move the starter back out of sight and fit back into its slot. The two bolts should be started into their threads and once in tightened down. The intake manifold support needs to be put back in place and the oil filter replaced. Next picture shows behind the engine where the starter is mounted (absent the starter).


The air filter housing is then put back in place and the intake hose is reattached along with a hose that attaches on its left. The clamps and rings are tightened back down or put in place. The air filter is put back and the case clamped down. A hose that clips in over top all of this is put back in its holders. The battery is put back and the terminals reattached and tightened down.


Last picture showing engine area reassembled. Hopefully, at this point the key will be turned in the ignition and the starter will start right up. Mine did and starts much faster now.  Need to drive more and see how does over time but so far so good.


Thursday, July 21, 2005

Fun With Nissan


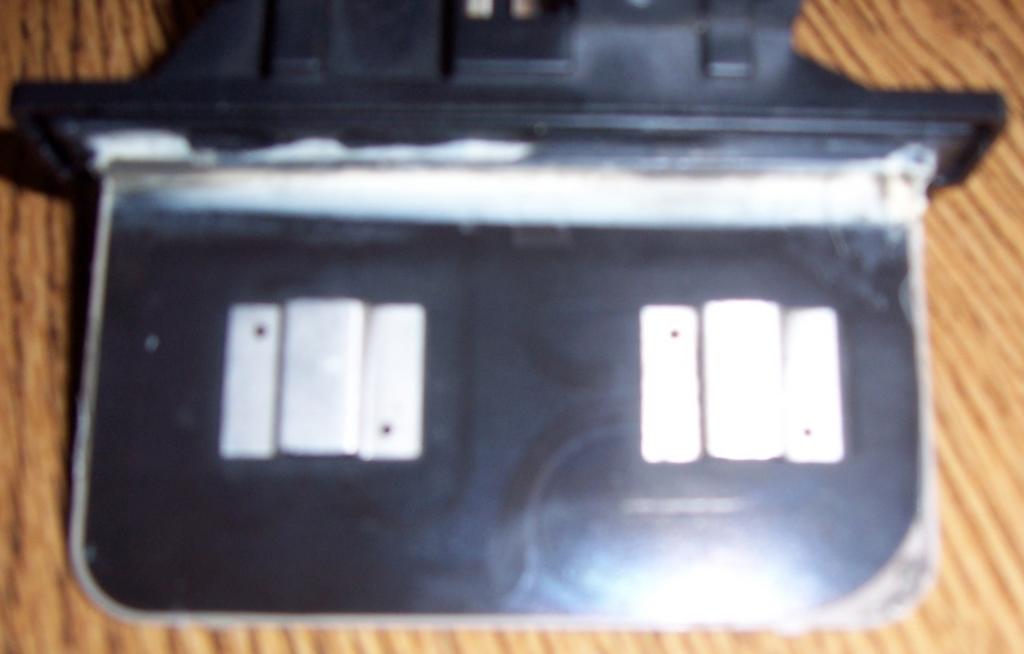
Well, I went to the Nissan dealer to buy a new fan resistor board. I could not figure out how to fix the other one. I think there is a fuse inside the connector casing that has blown. The schematic shows a fuse but I do not see it on the board.


So I pull into the parking lot and get out. I go over to the passenger side and detach the circuit board from the place under the glove compartment. I take the board into the parts department and ask for the replacement part. The guy seems to be familiar with the part and pulls it from a shelf not far from his computer. It costs $26.86 and is part number 27150-62J60. I then took the part out to the parking lot and reattached it to the cable and bolted it back in. Started the engine and the fan works on all settings. It was kind of funny fixing it in their parking lot in about 3 minutes. Being hot outside I needed that fan with A/C in the car.

If you look at the new board (not really in focus), you will see a silver looking rectangle at the left of the board. I think this is the fuse. It will melt if too much current is put through it. The nice thing is it can be repaired but if it were to burn through, why?

I got new pedals for my bicycle and two new tires. The owner of the store told me another model was less prone to flats so I bought those. I think they were more expensive than my car tires! But I do not want a flat on that bike miles from anywhere so they will be worth it.

Thursday, May 19, 2005

Restoring Old Hubcaps

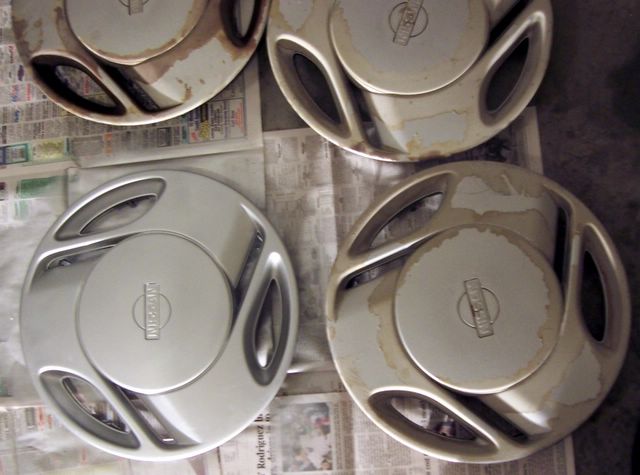
The 1992 Nissan I bought a while back had a particular exterior appearance that bothered me... the hubcaps. The hubcaps were made of a grayish plastic that had a dull silver/grey finish. The finish had began to peel and fade after 13 years. The car was not cleaned very often so the front two hubcaps had quite of bit black powder residue from the brakes. So I decided to get some new ones.

I checked on the Internet and found a hubcap site that sold them for $40 a piece. This seemed a little high, so I looked up hubcap places around Louisville and found several. I called a place on Dixie Highway and the guy said he had 4 in stock at $20 a piece. So I had the day off so I drove over and found that he only had two and they looked used. He told me he could refinish the old ones for $10 a piece. I told him I might get back to him.

After some investigation, I decided to try and refinish them myself. I went to Autozone and bought some silver/grey spray paint. I then took a Dremel tool and with a sanding attachment began to work on one hubcap. The hubcap had a number of deep scratches from running into curbs. I was able to sand these out for the most part. The Dremel was only good around the outer diameter and on some of the flat parts. Next I got a power sander and used a fine grit and paper to take the paint and residue of the main part of hubcap. Using a piece of sand paper I worked into the contours of the cap and removed the paint around these areas. This sanding creates quite a bit of dust so I blew it away with an air compressor. After the hubcap was sanded and clean of dust, I washed it with Palmolive dish soap and cleaned the residue off the back of the cap. After a through washing I let the hubcap dry.

I went to Home Depot and bought some primer for plastic spray paint and some clear sealer spray paint with UV protection. I then sprayed the primer on the hubcap in light bursts going horizontally across. Once the cap seem covered from one angle I would shift 120 degrees and spray from that direction. I did this again would confidence that primer was on the hubcap. After waiting 20 minutes I applied another coat of primer and let the hubcap sit overnight.

The next day I sprayed the paint on the hubcap using the same technique. I waited 20 minutes and gave it another coat of paint. I may have waited another 10-15 minutes and applied a third coat. I then let it sit overnight to dry. Things went well with that hubcap, so I sanded and cleaned the other 3 hubcaps. I then applied primer to them.

I spent the next day cleaning and sanding the hubcaps some more. The front tire caps were especially hard to clean with the black matter from the brakes. I then tried to polish the painted hubcap with the Dremel polishing attachment. This was not a good idea, it started making marks on the cap so I repainted it again to cover these marks up.

The next day I applied the sealer to the painted hubcap. In retrospect, I may have let the sealer coat concentrate too much on some hubcaps. So be careful when applying sealer, do not keep the nozzle pointing at one section for more than a fraction of a second. I finished painting the other three hubcaps.

The fourth day, I had one finished hubcap (see picture of the one painted the others still dirty). I then sealed the remaining hubcaps.

After I put them on the car, it made them look almost brand new. If you got close to the hubcap you could see the sanding marks, also I could not remove all the scratches. All in all they look nice.

Time will tell if the paint job holds but I have now traveled through several storms and they seem to be holding up well. Just in case, I have saved my paint for doing touch up work.

Tuesday, May 17, 2005

Maintenance on a Nissan NX-1600

Today I finally change the PCV valve and sparks plugs on the Nissan NX-1600. The engineers who developed the car did a nice job of placing the devices within easy access. The sparks plugs are all right on top of the engine and in plain view after lifting the hood. I did not have the correct fitting for the torque wrench so I just tightened them back until they were snug. Not being a car expert, I consulted the Autozone website on spark plugs. Looking at their pictures, the spark plugs I removed looked like they were wearing normally. The electrode had turned grey and around it there was brownish residue. The spark cap on some of the plugs had reached .045 and it should be .039-.043 (I think).

I replaced the 4 plugs with Bosch Platinum plugs so they should not have to be changed for a while. The PCV value was a little more difficult to change since a tube needed to be removed. It is right next to one of the spark plugs and very easy to access. The one I removed had quite a bit of black gunk on both of its openings. I shook it and it rattled so that should means it is still working. My cousin told me that gunk means the oil was not being changed enough.

Drove the car around the neighborhood for about 1-2 miles and it seemed to have good pickup. I will know tomorrow after taking it out on the highway for an extended run. Still need repair/replace the muffler and hangers. Makes a rattling sound. Also need to change the oil and filter.

I am finding this car to be a pretty good commuter car. I gets gas mileage in the 30s mpg. The small size and lack of acceleration at speeds over 40 mph keep you on your toes around large trucks and SUVs. As summer approaches I am sure the lack of A/C will make me rethink why I am driving it.