The 1992 Nissan I bought a while back had a particular exterior appearance that bothered me... the hubcaps. The hubcaps were made of a grayish plastic that had a dull silver/grey finish. The finish had began to peel and fade after 13 years. The car was not cleaned very often so the front two hubcaps had quite of bit black powder residue from the brakes. So I decided to get some new ones.
I checked on the Internet and found a hubcap site that sold them for $40 a piece. This seemed a little high, so I looked up hubcap places around Louisville and found several. I called a place on Dixie Highway and the guy said he had 4 in stock at $20 a piece. So I had the day off so I drove over and found that he only had two and they looked used. He told me he could refinish the old ones for $10 a piece. I told him I might get back to him.
After some investigation, I decided to try and refinish them myself. I went to Autozone and bought some silver/grey spray paint. I then took a Dremel tool and with a sanding attachment began to work on one hubcap. The hubcap had a number of deep scratches from running into curbs. I was able to sand these out for the most part. The Dremel was only good around the outer diameter and on some of the flat parts. Next I got a power sander and used a fine grit and paper to take the paint and residue of the main part of hubcap. Using a piece of sand paper I worked into the contours of the cap and removed the paint around these areas. This sanding creates quite a bit of dust so I blew it away with an air compressor. After the hubcap was sanded and clean of dust, I washed it with Palmolive dish soap and cleaned the residue off the back of the cap. After a through washing I let the hubcap dry.
I went to Home Depot and bought some primer for plastic spray paint and some clear sealer spray paint with UV protection. I then sprayed the primer on the hubcap in light bursts going horizontally across. Once the cap seem covered from one angle I would shift 120 degrees and spray from that direction. I did this again would confidence that primer was on the hubcap. After waiting 20 minutes I applied another coat of primer and let the hubcap sit overnight.
The next day I sprayed the paint on the hubcap using the same technique. I waited 20 minutes and gave it another coat of paint. I may have waited another 10-15 minutes and applied a third coat. I then let it sit overnight to dry. Things went well with that hubcap, so I sanded and cleaned the other 3 hubcaps. I then applied primer to them.
I spent the next day cleaning and sanding the hubcaps some more. The front tire caps were especially hard to clean with the black matter from the brakes. I then tried to polish the painted hubcap with the Dremel polishing attachment. This was not a good idea, it started making marks on the cap so I repainted it again to cover these marks up.
The next day I applied the sealer to the painted hubcap. In retrospect, I may have let the sealer coat concentrate too much on some hubcaps. So be careful when applying sealer, do not keep the nozzle pointing at one section for more than a fraction of a second. I finished painting the other three hubcaps.
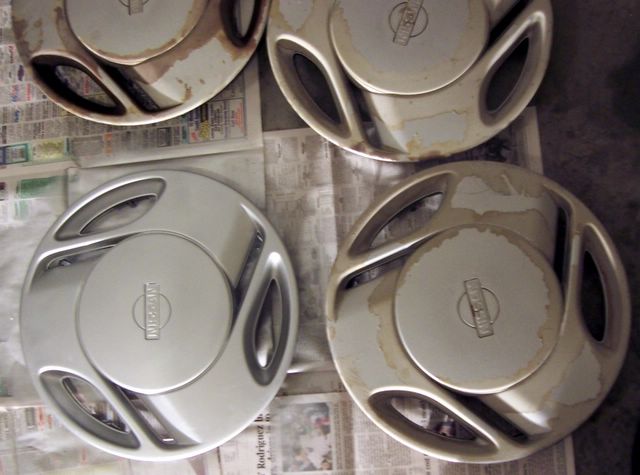
The fourth day, I had one finished hubcap (see picture of the one painted the others still dirty). I then sealed the remaining hubcaps.
After I put them on the car, it made them look almost brand new. If you got close to the hubcap you could see the sanding marks, also I could not remove all the scratches. All in all they look nice.
Time will tell if the paint job holds but I have now traveled through several storms and they seem to be holding up well. Just in case, I have saved my paint for doing touch up work.
Thursday, May 19, 2005
Wednesday, May 18, 2005


Tuesday, May 17, 2005
Maintenance on a Nissan NX-1600
Today I finally change the PCV valve and sparks plugs on the Nissan NX-1600. The engineers who developed the car did a nice job of placing the devices within easy access. The sparks plugs are all right on top of the engine and in plain view after lifting the hood. I did not have the correct fitting for the torque wrench so I just tightened them back until they were snug. Not being a car expert, I consulted the Autozone website on spark plugs. Looking at their pictures, the spark plugs I removed looked like they were wearing normally. The electrode had turned grey and around it there was brownish residue. The spark cap on some of the plugs had reached .045 and it should be .039-.043 (I think).
I replaced the 4 plugs with Bosch Platinum plugs so they should not have to be changed for a while. The PCV value was a little more difficult to change since a tube needed to be removed. It is right next to one of the spark plugs and very easy to access. The one I removed had quite a bit of black gunk on both of its openings. I shook it and it rattled so that should means it is still working. My cousin told me that gunk means the oil was not being changed enough.
Drove the car around the neighborhood for about 1-2 miles and it seemed to have good pickup. I will know tomorrow after taking it out on the highway for an extended run. Still need repair/replace the muffler and hangers. Makes a rattling sound. Also need to change the oil and filter.
I am finding this car to be a pretty good commuter car. I gets gas mileage in the 30s mpg. The small size and lack of acceleration at speeds over 40 mph keep you on your toes around large trucks and SUVs. As summer approaches I am sure the lack of A/C will make me rethink why I am driving it.
My First Post
Cycling for a Good Cause
I did not realize until last week that a former classmate of mine had died of cancer. A surviving sibling is now raising money to fight cancer with a bicycle ride. Here is the weblink in case you might be interested and in the Louisville, Kentucky area in early August. http://www.sunshineride.org
I use to ride quite a few events: New Albany Harvest Homecoming, Derby Legal Aid Society, Indianapolis Nite Ride, and Charlestown Depot. Once I got a house my free time went away...
How I spent my evening:
I am continually amazed at the amount of work that needs to be done to keep a house shape. Tonight I was fixing up nail pops in the walls. This process involves either: 1) Pulling the nail and replacing it with a drywall screw or 2) driving the nail back into the wall. Once the protrusion is back in the wall, drywall compound (mud) is applied over the area. It then depends out how many coats are need until the sunken area is filled. After it drys, the mud is sanded down. The area is sponged and/or vacuumed of dust and then the area is painted until the spot disappears. Time is then spent cleaning up the paint supplies and removing the plastic from the area.
Subscribe to:
Posts (Atom)